Free Sales Lead Software User Guide
ABOUT THE SOFTWARE
Our Sales Lead Software is a cutting-edge solution designed to help businesses manage their sales leads efficiently. Whether you're a sales professional, a small business owner, or part of a large sales team, this software is your go-to tool for streamlining lead management, improving conversion rates, and boosting sales.
1. System Requirements
To ensure that you can seamlessly harness the power of our Sales Lead Software, here are the detailed system requirements, presented in a clear step-by-step format:
1.1 Device Compatibility
Our Sales Lead Software is designed to be versatile and accessible, so you can use it on various devices, including desktop computers, laptops, tablets, and even mobile phones. This means you can work on your sales leads from anywhere, whether you're at your desk, in a coffee shop, or on the go.
1.2 Internet Connection
You'll need an internet connection to access our cloud-based platform. A stable and reasonably fast internet connection will ensure that you can access your sales leads and data without interruptions. This is especially important for real-time updates and collaboration with your team.
1.3 Web Browser
Our software is optimized to work smoothly with modern web browsers. We recommend using the latest versions of popular browsers such as Google Chrome, Mozilla Firefox, or Apple Safari for the best experience. These browsers provide excellent compatibility and security for your data.
1.4 No Installation Required
One of the great conveniences of our Sales Lead Software is that there's no need to install any software on your device. Everything is cloud-based, which means you don't have to worry about updates or system requirements changes. You can access the software directly through your browser.
1.5 Data Security
We understand the importance of data security, and we take it seriously. Your data is stored securely in the cloud, and we employ robust encryption and security protocols to ensure that your information remains safe and protected.
2. Getting Started
Now, let's dive into the process of getting started with our Sales Lead Software. We want to ensure you have a smooth and successful onboarding experience. Here are detailed steps, along with expanded information on each:
2.1 Registration
To embark on your journey with our Sales Lead Software, begin by registering for an account. This is an essential first step:
Step 1: Click on the "Sign Up" button, which you can easily locate on our website's homepage.
Step 2: Fill in your registration details, which include your name, email address, and the creation of a strong, unique password. This information will be associated with your account and will allow you to access our platform.
Step 3: We prioritize your data security and have implemented robust measures to ensure your personal and business information remains confidential and protected.
2.2 Logging In
Returning users can access their accounts by following these steps:
Step 1: Visit our website and click the "Log In" button.
Step 2: Enter the email address and password associated with your account.
Step 3: In case you ever forget your password, don't worry. Just click on the "Forgot Password" link, and our system will guide you through a secure password recovery process, allowing you to regain access to your account.
2.3 Account Settings
Once you're logged in, you can customize your account settings to suit your preferences and needs:
Click on your profile picture, which you'll find in the top-right corner of the screen.
Here, you can update your personal information, including your name and contact details, ensuring that your account information is always up to date.
You also have the option to change your password if you ever feel the need to enhance your account's security.
Additionally, you can manage your notification preferences, allowing you to control how and when you receive updates and alerts.
This is just the beginning of your journey with our Sales Lead Software. Once you're logged in and your account is set up to your liking, you'll gain access to the dynamic features of our user-friendly dashboard, where you can manage your sales leads, track their progress, and ultimately supercharge your sales performance.
3. User Registration
3.1 Creating Your Account
Registration is a breeze. Simply click the "Sign Up" button on our website's homepage. Fill in your details, including your name, email, and a strong password. We take your data security seriously, so rest assured that your information is safe with us.
3.2 Logging In
Returning users can log in with their registered email and password. If you forget your password, don't worry! Just click the "Forgot Password" link, and we'll guide you through the password recovery process.
3.3 Account Settings
You can customize your account settings by clicking on your profile picture in the top-right corner. Here, you can update your personal information, change your password, and manage your notification preferences.
4. Dashboard
4.1 Overview
Imagine the Dashboard as the control center of your Sales Lead Software, where you orchestrate your sales journey. This dynamic hub grants you a panoramic view of your leads, their real-time status, and essential performance metrics. With the Dashboard, you're in the driver's seat, allowing you to effortlessly gauge the pulse of your sales efforts and stay in the know about where your business is headed.
4.2 Managing Sales Leads
Effortless lead management unfolds right on the Dashboard. Adding, editing, and filtering leads is a breeze, making it a one-stop destination for lead nurturing. You have the power to categorize leads, delegate them to team members, and preserve a detailed record of your communication history with each prospect. This seamless integration ensures that you're always well-prepared for your next move in the sales game.
4.3 Reporting
Unlock the treasure trove of insights available through your Dashboard's reporting section. Here, you gain access to a wealth of data that reveals lead conversion rates, and source performance, and even illuminates sales forecasts. Armed with this invaluable information, you can make strategic, data-driven decisions, fine-tune your sales strategies, and guide your business toward greater success. The Reporting feature is your compass, guiding you to the right path for optimal results.
5. Adding and Managing Leads
5.1 Adding and Managing Leads
Step 1: Access the Dashboard
Log in to your account and access the dashboard by clicking on the "Dashboard" tab in the top navigation menu.
Step 2: Create a New Lead
On the dashboard, locate and click the "+ New Lead" button, typically found in the upper right corner.
Step 3: Enter Lead Details
A new window or form will appear, prompting you to enter the lead's information. Fill in the following details:
Name: Enter the lead's full name.
Company: Specify the name of the lead's company or organization.
Contact Information: Include the lead's email address and phone number for easy communication.
Source: Select the source from which you acquired this lead, such as a trade show, website form, or referral.
Step 4: Customize Lead Stages
After entering the lead's basic information, you can customize the lead stages to match your specific sales process. Common stages may include "Prospect," "Contacted," "Qualified," and "Closed-Won." You can assign the lead to a particular stage to reflect their current status in your sales pipeline.
Step 5: Assign Tasks for Follow-Up
To ensure you don't miss any important interactions with the lead, you can assign tasks directly from the lead creation window. These tasks can include setting up follow-up calls, sending introductory emails, or any other action you need to take regarding this lead.
Step 6: Save the Lead
Once you've entered all the relevant information and customized lead stages and tasks, don't forget to click the "Save" or "Create Lead" button. Your new lead is now added to your system and can be accessed and managed from your dashboard.
5.2 Importing Leads
Save time by importing leads in bulk. Supported file formats include CSV and Excel. Map your data fields and let the software do the rest.
5.3 Lead Details
Click on a lead to access their detailed information, including notes, emails, and tasks. This is your central hub for all interactions with the lead.
5.4 Lead Status and Progress
Track the progress of your leads by updating their status. Use custom lead stages to match your specific sales process and keep an eye on where each lead stands in your pipeline.
6. Lead Scoring
6.1 Scoring System
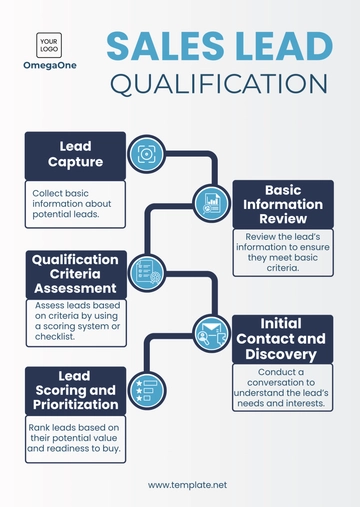
Our lead scoring system helps you identify high-quality leads. Assign scores based on criteria that matter most to your business, such as engagement level, industry relevance, or budget.
6.2 Scoring Leads
After setting up your scoring system, apply scores to leads. The software will automatically calculate and prioritize the leads with the highest scores, making it easy to focus on the most promising prospects.
6.3 Filtering High-Quality Leads
Utilize filters to quickly view and work with leads that meet your scoring criteria. This ensures you're always working on leads with the greatest potential for conversion.
7. Communication
7.1 Email Integration
Our Sales Lead Software offers seamless email integration to streamline your communication process. Connect your email accounts to the software and send and receive messages directly from your lead profiles. This integration ensures you never miss an important email and keeps all communication history in one place for easy reference.
7.2 Task Management
Efficient task management is vital for staying on top of your sales leads. With our task management feature, you can create, assign, and track tasks related to each lead. Set due dates, prioritize tasks, and receive reminders to ensure you follow up with leads promptly.
7.3 Notifications
Stay informed and never miss a beat with our notification system. Receive real-time notifications about lead interactions, task updates, and important events in your sales pipeline. Customize your notification preferences to ensure you're always aware of critical developments in your sales process.
8. Reporting and Analytics
8.1 Generating Reports
Generate comprehensive reports with a few clicks. Our Sales Lead Software provides customizable reporting tools that allow you to create detailed reports on lead conversion rates, lead source performance, and more. Analyze your data and make data-driven decisions to refine your sales strategies.
8.2 Performance Analytics
Dive deep into your sales performance with performance analytics. Our software offers insights into lead engagement, sales team productivity, and conversion rates. Visualize your data through graphs and charts, helping you identify trends and areas for improvement.
8.3 Forecasting
Forecasting is a valuable feature for planning and decision-making. With our forecasting tools, you can predict future sales performance based on historical data. Gain valuable insights into potential revenue and resource requirements, enabling you to prepare for what lies ahead.
9. Troubleshooting and Support
9.1 Frequently Asked Questions
Q1: How do I reset my password?
A: To reset your password, click "Forgot Password" on the login page. Follow the prompts to receive a password reset link in your email.
Q2: Can I export my data?
A: Yes, you can export your data. Go to the Reports section and select the data you want to export. Click "Export," and choose your preferred format (CSV or Excel).
9.2 Troubleshooting Common Issues
Issue 1: Unable to Log In | Issue 2: Emails Not Syncing |
Solution: Double-check your login credentials. If you've forgotten your password, use the "Forgot Password" feature to reset it. Ensure your internet connection is stable. | Solution: Verify your email integration settings. Check your email account's connection status. If the issue persists, contact our support team for assistance. |
9.3 Contacting Support
For any questions, issues, or assistance, our support team is here to help. You can reach us via:
Email: [Your Company Email]
Phone: [Your Company Number]
Live Chat: Visit our website and click the chat bubble in the bottom-right corner. Our support agents are available 24/7 to assist you.
- 100% Customizable, free editor
- Access 1 Million+ Templates, photo’s & graphics
- Download or share as a template
- Click and replace photos, graphics, text, backgrounds
- Resize, crop, AI write & more
- Access advanced editor
Ensure seamless utilization of sales lead software with our Sales Lead Software User Guide Template, accessible on Template.net. Tailored with industry keywords, this editable document simplifies communication. Utilize our AI Editor Tool for seamless customization, ensuring precise instructions. Elevate your sales strategy with this comprehensive template designed for user-friendly software guidance.

