Get Access to World’s largest Template Library & Tools

How To Make Borders in Microsoft Excel

Microsoft Excel provides a versatile set of tools for adding and customizing borders in your spreadsheets. Whether you’re preparing a report, organizing data, or creating an informative chart, borders can help distinguish and define specific areas of your Excel documents.
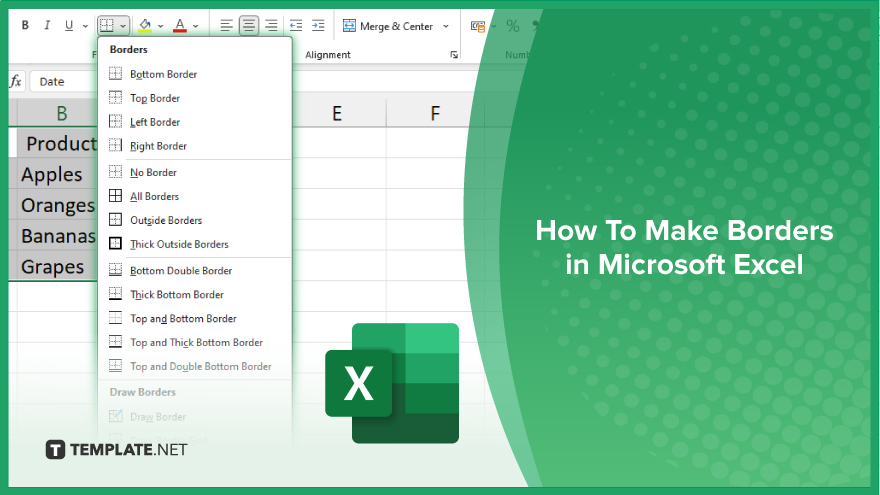
How To Make Borders in Microsoft Excel


Adding borders to cells in Microsoft Excel is a great way to enhance the visual organization and readability of your spreadsheets. Whether you’re highlighting key data or simply structuring your information more clearly, borders can significantly improve your document’s presentation. Here are the steps to create and customize borders in Excel effectively:

  • Step 1. Select Your Cells

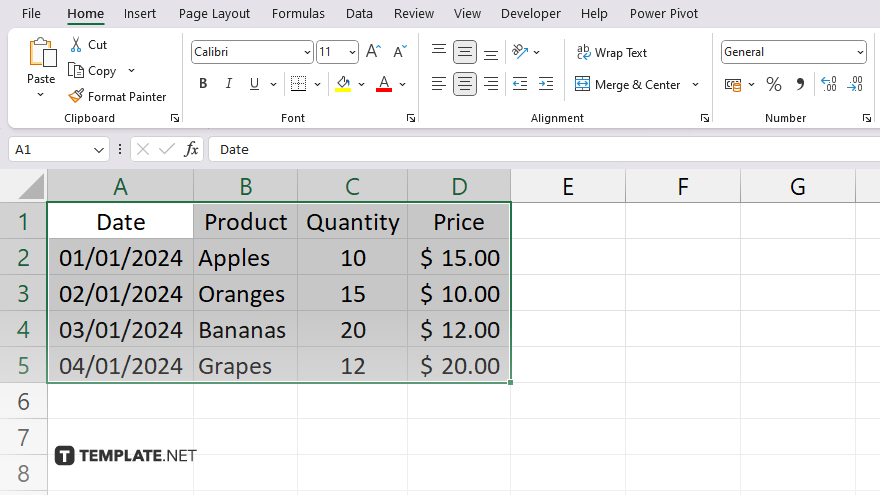
    step 1 select your cells

    Begin by opening your Excel workbook and navigating to the sheet where you want to add borders. Click and drag your mouse to select the cells that will receive the borders. You can select a range of cells, an entire row, an entire column, or even the whole sheet.

  • Step 2. Open the ‘Borders’ Menu

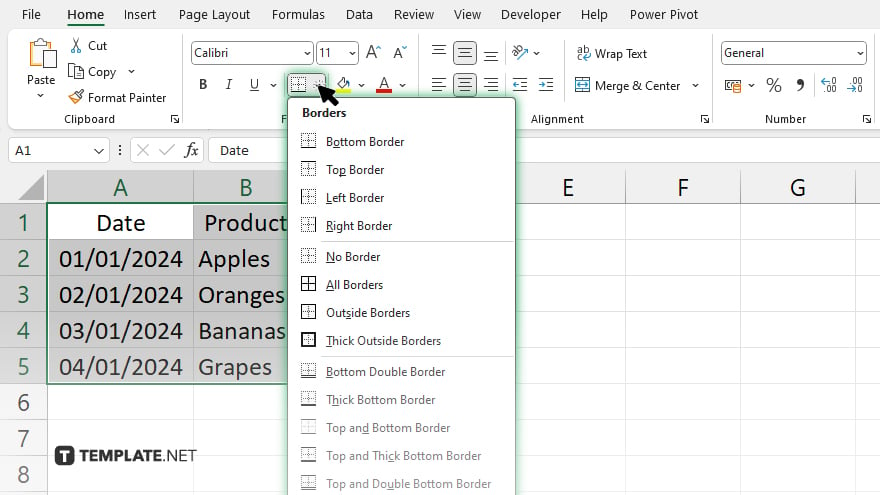
    step 2 open the borders menu

    With your cells selected, go to the “Home” tab on the Excel ribbon. In the “Font” group, you’ll find the “Borders” button, which looks like a grid. Click the drop-down arrow next to the Borders button to view all border options.

  • Step 3. Choose the Border Style

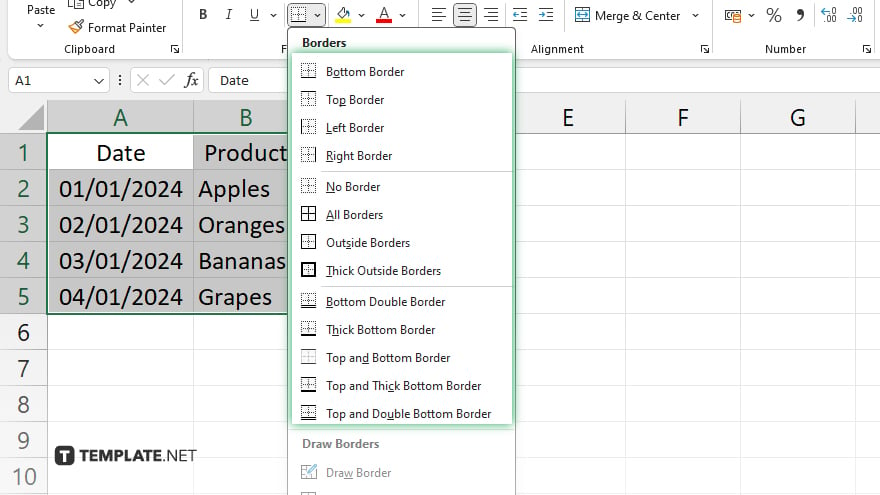
    step 3 choose the border style

    From the drop-down menu, you can choose which borders to apply. Options include adding borders to the outside of the selected cells, applying borders to the inside (between cells), or both. You can also choose specific borders like top, bottom, left, or right.

  • Step 4. Customize Border Style and Color

    For more specific customization, click “More Borders” at the bottom of the drop-down menu. This opens the “Format Cells” dialog box, where you can choose different line styles and colors. Select your preferred style and color to make your data stand out or match your company’s branding.

  • Step 5. Apply the Borders

    After setting your desired border style and color, click “OK” to apply the borders to the selected cells. You will immediately see the borders appear around and/or within the selected range, as specified.

You may also find valuable insights in the following articles offering tips for Microsoft Excel:

note iconNote

Unlock Your Productivity with Over 100,000 Microsoft Excel Templates! Exclusively Available at Template.net – Download Now and Transform Your Data Handling Experience!

FAQs

Can I apply different styles of borders to different sides of a cell?

Yes, you can apply different border styles to the top, bottom, left, and right sides of a cell individually.

How do I remove borders from a cell or range of cells?

To remove borders, select the cells, go to the “Borders” drop-down menu in the “Home” tab, and select “No Border.”

Is it possible to copy the border style from one cell to another?

Yes. You can use the “Format Painter” tool in the “Home” tab to copy border styles from one cell and apply them to others.

Can I create custom border styles that are not available in the standard menu?

You can customize border styles through the “More Borders” option in the “Borders” drop-down menu, where you can select different line styles and colors.

Do borders affect the way data is printed from Excel?

Yes, borders in Excel are reflected in printouts, enhancing the readability and presentation of your printed documents.

More in Excel

How to Remove Part of Text in an Excel CellHow to Add Strikethrough in Microsoft Excel
How to Add Drop Downs in Microsoft ExcelHow to Extract the Month from a Date in Microsoft Excel
How to Add a Zero in Front of a Number in Microsoft ExcelHow to Change Cell Color in Microsoft Excel
How to Add a Row in Microsoft Excel Using a ShortcutHow to Find R^2 in Microsoft Excel
How to Move to the Next Line in Microsoft ExcelHow to Calculate ROI in Microsoft Excel
How to Add a Tab in Microsoft ExcelHow to Create Lines in Microsoft Excel
How to Rotate Cells in Microsoft ExcelHow to Type Vertically in Microsoft Excel
How to Insert a Comma in Microsoft ExcelHow to Change Page Orientation in Microsoft Excel
How to Turn Off Read Only in Microsoft ExcelHow to Change to All Caps in Microsoft Excel
How to Download a Microsoft Excel FileHow to Share a Microsoft Excel File
How to Multiply 2 Columns in Microsoft ExcelHow to Get Rid of Empty Rows in Microsoft Excel
How to Find in Microsoft ExcelHow to Calculate Future Value in Microsoft Excel
How to Share a Microsoft Excel File with Multiple UsersHow to Make a Flow Chart in Microsoft Excel
How to Use If Then in Microsoft ExcelHow to Insert Numbers in Microsoft Excel
How to Draw a Line Through Text in Microsoft ExcelHow to Create a Forecast Sheet in Microsoft Excel
How to Resize Cells in Microsoft ExcelHow to Lock a Microsoft Excel File
How to AutoSum in Microsoft ExcelHow to Take Off Read Only in Microsoft Excel
How to Share Excel Files for Multiple Users Office 365How to Create Charts in Microsoft Excel
How to Start a New Line in Microsoft ExcelHow To Make a Map in Microsoft Excel
How to Remove a Table Microsoft ExcelHow to Join Cells in Microsoft Excel
How to Create a Microsoft Excel TemplateHow to Change the Date in Microsoft Excel
How to Turn Off Protected View in Microsoft ExcelHow to Add Numbers in a Microsoft Excel Column
How to Remove Duplicate Names in Microsoft ExcelHow to Fit a Microsoft Excel Sheet on One Page
How to Make an Interactive Calendar in Microsoft ExcelHow to Shrink Text to Fit Within Excel Cells
How to Clear the Microsoft Excel CacheHow to Ungroup in Microsoft Excel
How to Merge Tables in Microsoft ExcelHow to Run a Correlation in Microsoft Excel
How to Make a Row a Header in Microsoft ExcelHow to Count Highlighted Cells in Microsoft Excel
How To Move to Next Line in Microsoft ExcelHow to Insert Cells in Microsoft Excel
How to Copy Numbers in Excel Without the FormulaHow to Create an Invoice in Microsoft Excel
How to Find the Payback Period in Microsoft ExcelHow to Add a Secondary Vertical Axis in Microsoft Excel
How to Delete a Comment in Microsoft ExcelHow to Extend a Table in Microsoft Excel
How to Edit a Pivot Table in Microsoft ExcelHow to Compare Columns in Microsoft Excel
How to Run a Multiple Regression in Microsoft ExcelHow To Add Title to a Chart in Microsoft Excel
How to Merge Cells in Microsoft Excel on MacHow to Use a Slicer in Microsoft Excel
How to Edit a Graph in Microsoft ExcelHow to Delete Comments in Microsoft Excel
How to View Macros in Microsoft ExcelHow to Add Trend Lines in Microsoft Excel
How to Create a Balance Sheet in Microsoft ExcelHow to Copy and Paste a Formula in Microsoft Excel
How to Drag Numbers Down in Microsoft ExcelHow to Sort by Name in Microsoft Excel
How to Separate Addresses in Microsoft ExcelHow to Make a CSV File in Microsoft Excel
How to Wrap Cells in Microsoft ExcelHow to Show the Developer Tab in Microsoft Excel
How to Unfreeze Columns in Microsoft ExcelHow To Calculate Difference in Time in Excel
How To Read Excel Files in PythonHow to Switch Rows in Microsoft Excel
How To Go To the Next Line in an Excel CellHow to Make a Microsoft Excel Spreadsheet Shared
How to Use the TRIM Function in Microsoft ExcelHow to Add All Numbers in a Column in Excel
How to Remove Empty Rows in Excel at the BottomHow to Make Drop Downs in Microsoft Excel
How to Divide Columns in Microsoft ExcelHow to Freeze the Header Row in Microsoft Excel
How to Recover a Previous Version of an Excel FileHow to Pivot in Microsoft Excel
How to Use the INDIRECT Function in Microsoft ExcelHow to Copy Table from Microsoft Excel to Word
How to Make a Checkmark in Microsoft ExcelHow to Find and Remove Duplicates in Microsoft Excel
How to Freeze Columns and Rows in Microsoft ExcelHow To Enter to a New Line in Microsoft Excel
bottom banner