![How to Add a Signature in Microsoft Forms [Templates + Examples] 2026](https://images.template.net/wp-content/uploads/2022/07/How-to-Add-a-Signature-in-Microsoft-Forms-Templates-Examples-2023-788x443.jpg)
How to Add a Signature in Microsoft Forms [Templates + Examples] 2026
Signatures found in documents establish who you are as an individual or as an organization. Aside from the fact that…
Dec 22, 2025


Sep 02, 2025
Microsoft Publisher can be a powerful tool in creating and designing brochures to highlight and promote your company, brand, product, or services to your potential customers. So, quickly and effectively make them using MS Publisher’s built-in templates with the help of this simple tutorial.

In Microsoft Publisher, you may create your own 3- or 4-panel brochures by choosing from a variety of pre-installed design templates or, with practice, by starting from scratch. You can even include elements like reply forms and an address section to make the brochures more unique.


Choosing a built-in design template is the simplest way to start with the creation of your brochure. Launch your Microsoft Publisher application. To create a brochure, go to the File tab of the Publisher ribbon and click on New. Then, select “Built-In”. From the displayed categories, choose Brochures. After that, select the brochure template that you want to use as a reference for making your brochure.
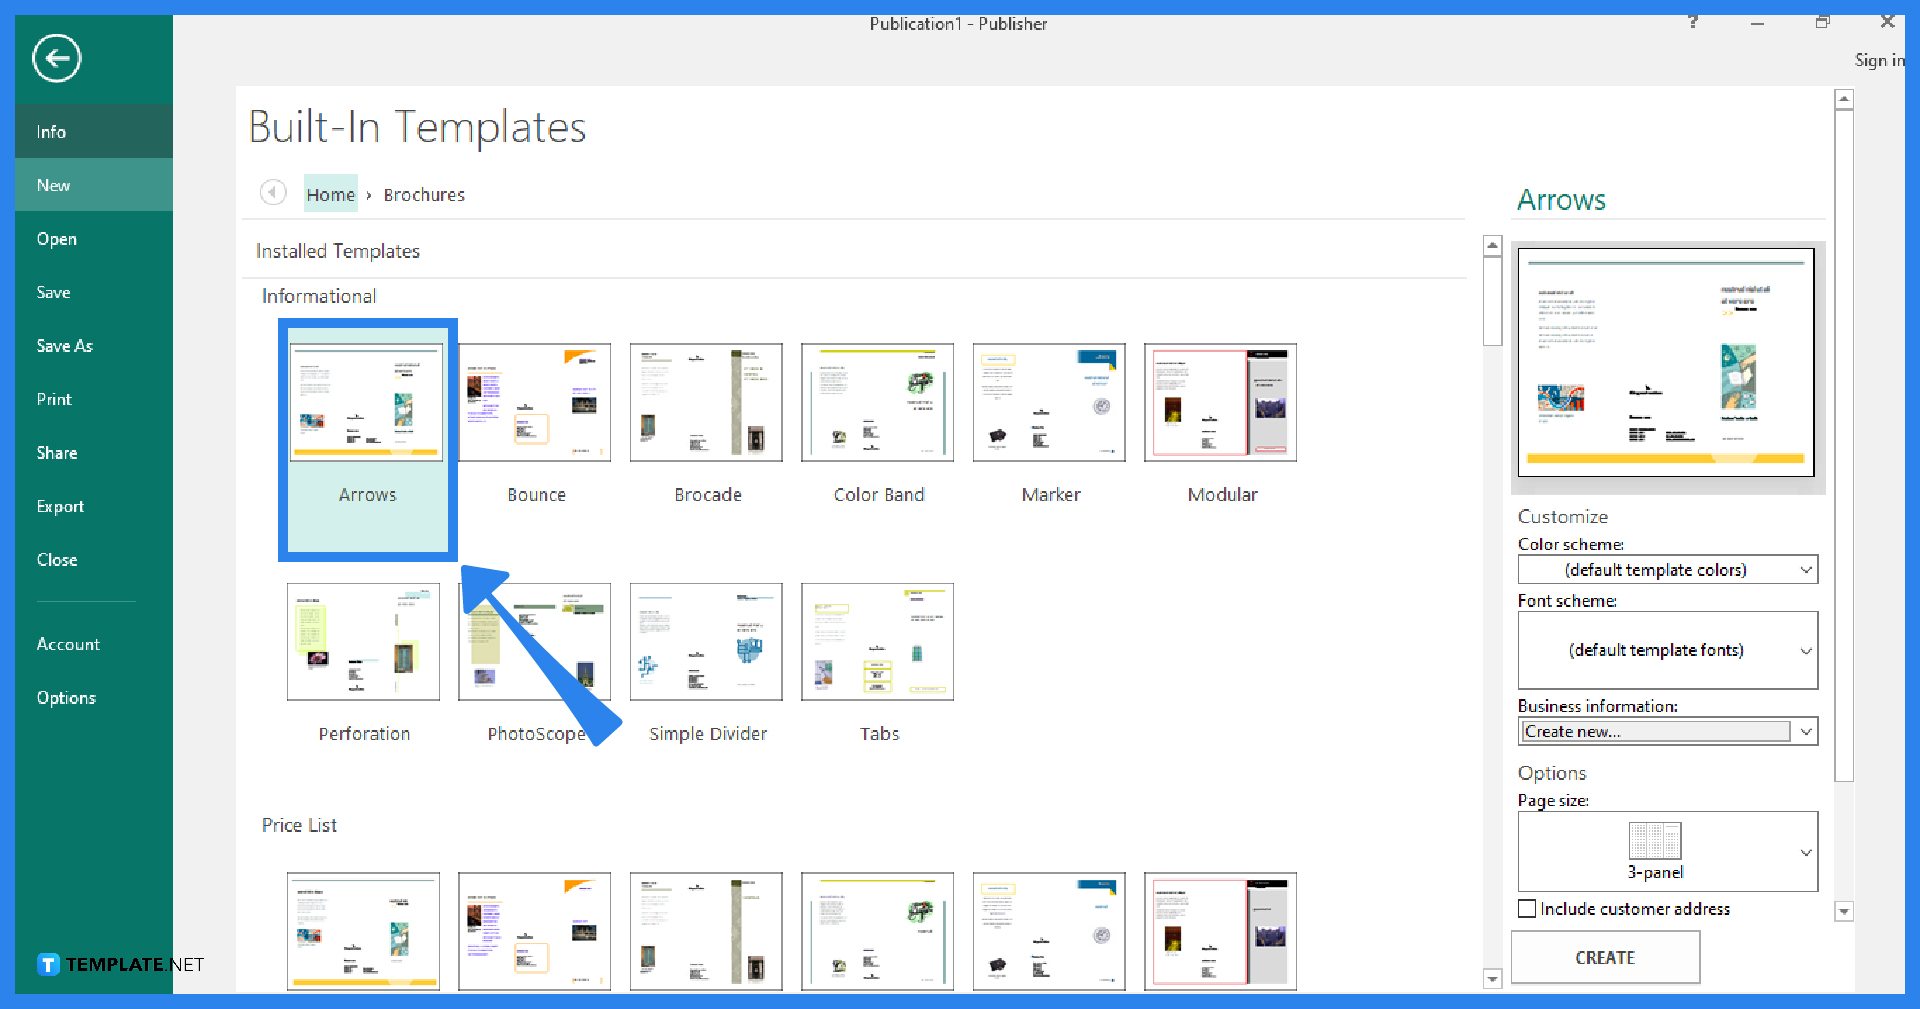
Once you’ve selected a brochure template (such as the “Arrows” brochure template), move to the right side of the screen and make the necessary adjustments there under the Customize & Options menu. After that, click on the “Create” button to open the brochure template.
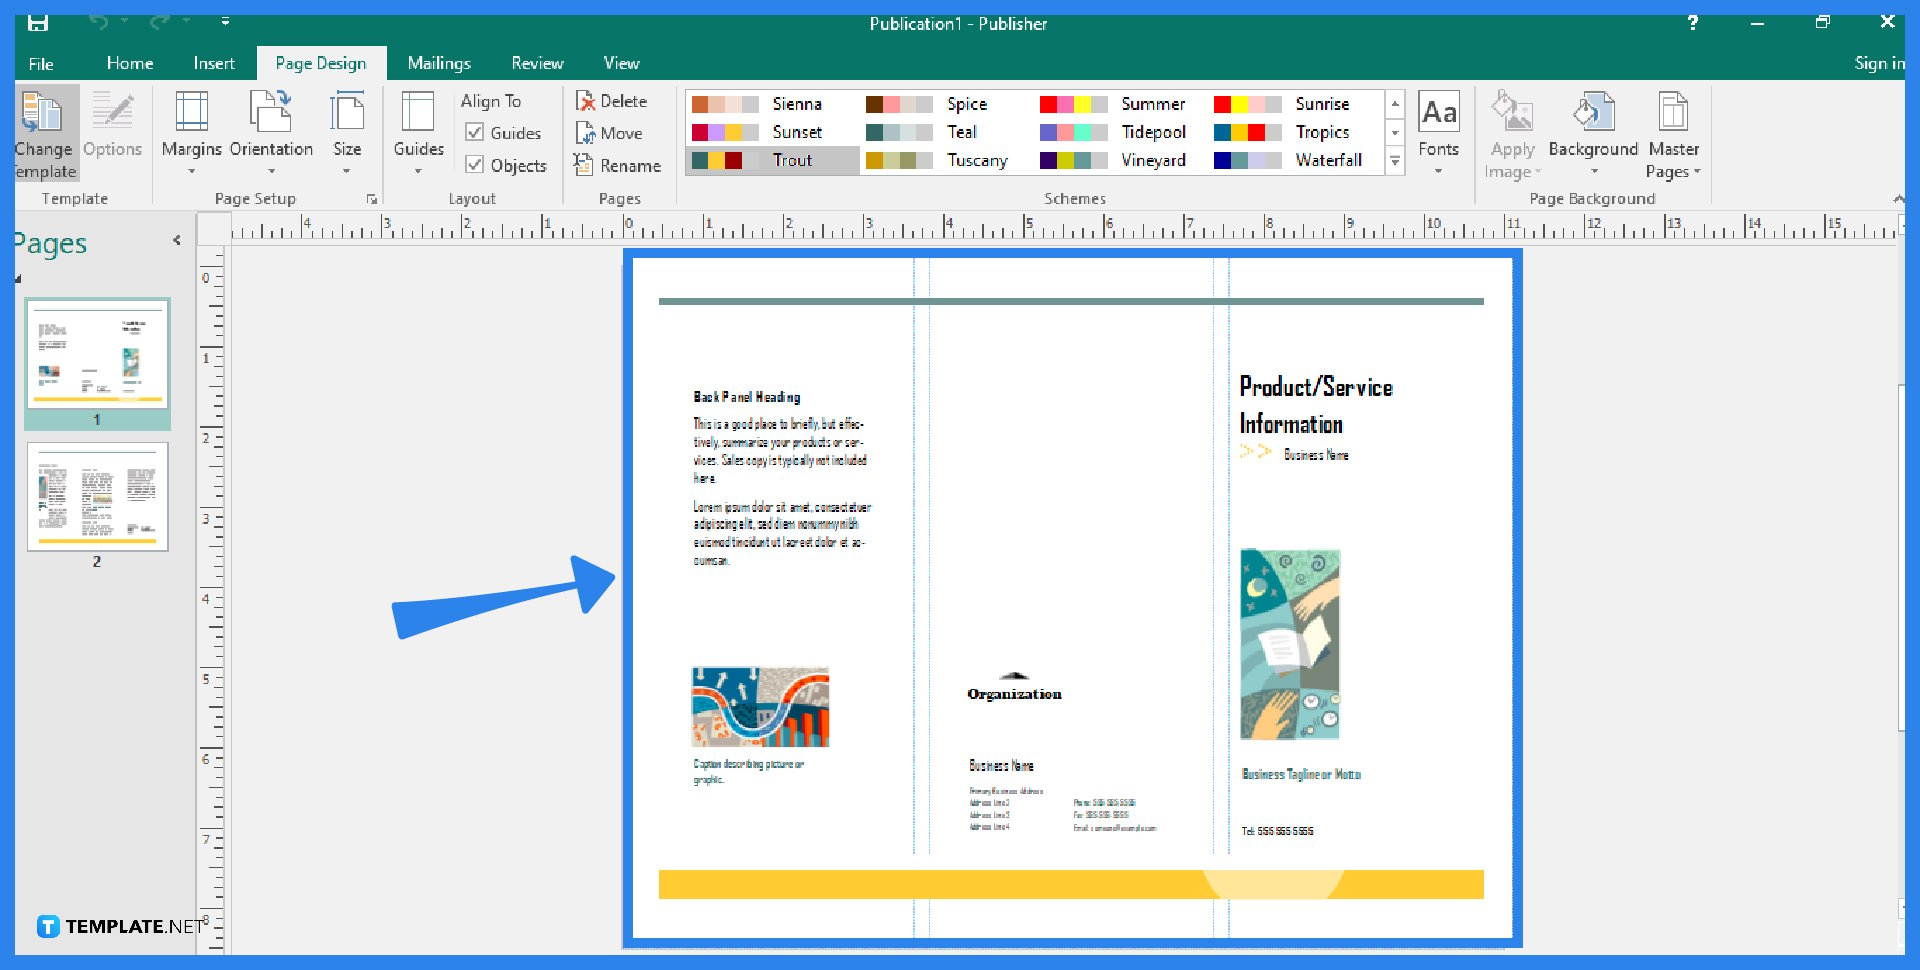
You can now customize the template that you have chosen. Go to the Page Design tab of the Microsoft Publisher ribbon and experiment with color themes, fonts, and backgrounds that will meet your needs. You can also add pictures or objects of your choice to the brochure to make it more attractive. Simply select the “Pictures” option from the Home tab. Additionally, replace the placeholder text in your brochure with the necessary and required information you want.
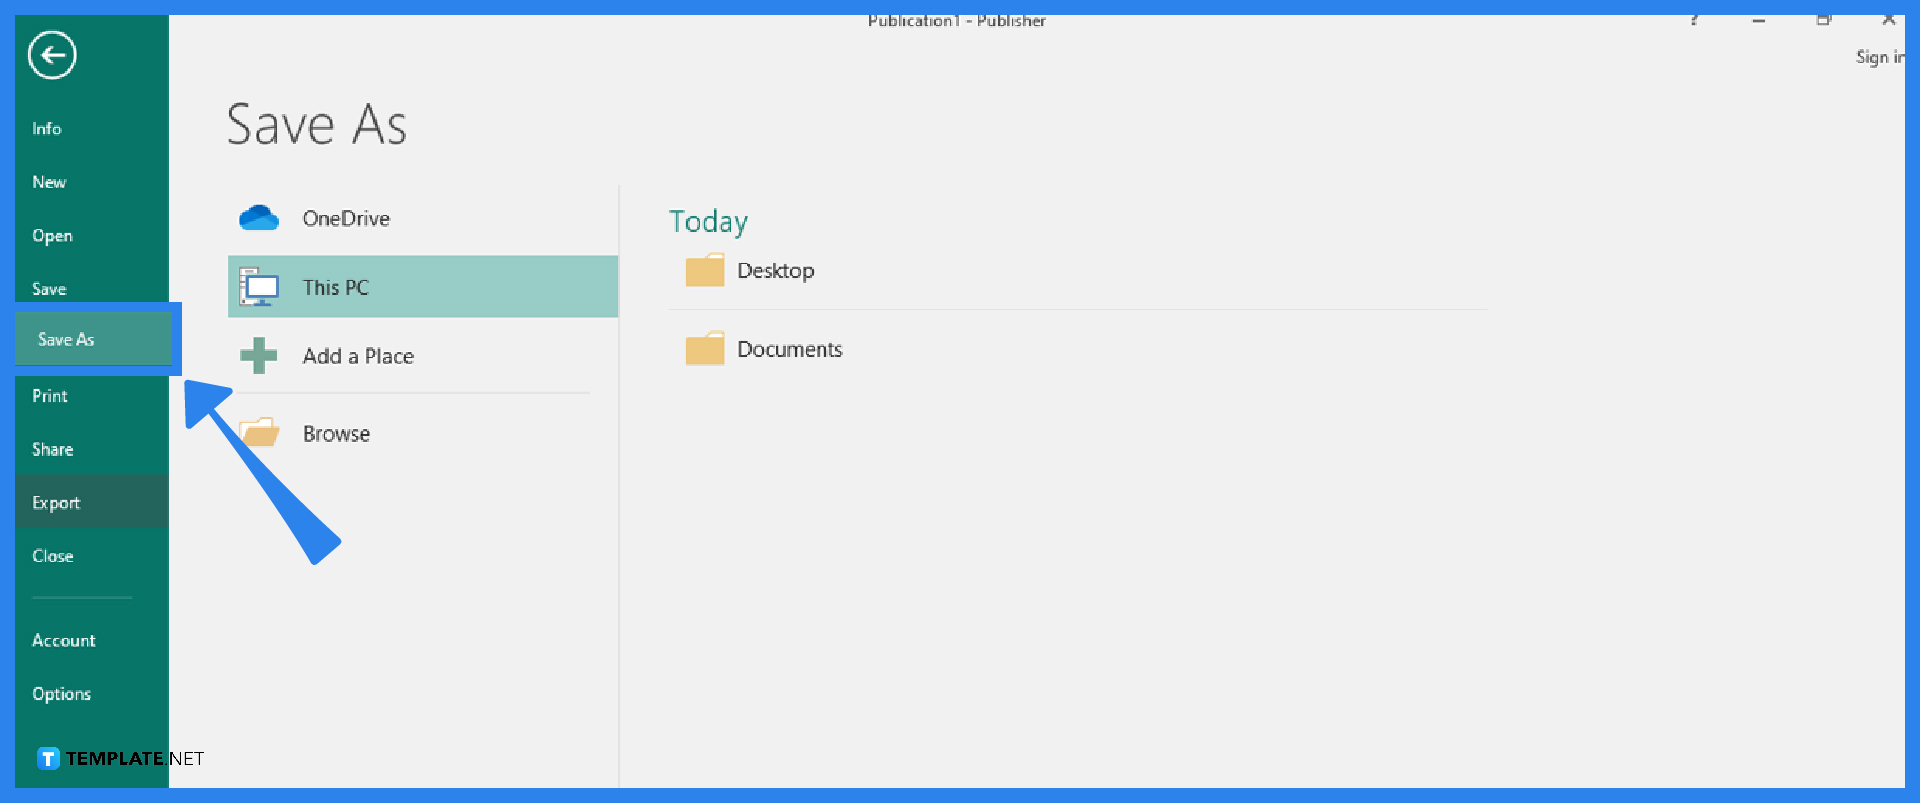
Once you are satisfied with the results of your brochure, you can save or print it. To save, go to the File tab, click the Save As button, select the location for your file, enter the name of the file, select the type of the file, and click Save. On the other hand, to print your brochure, select the File tab, click Print, and choose an option to either click Export to find “Create PDF/XPS” or other “Pack and Go” options for photo or commercial printing, or click Print to make copies on your personal printer.
Definitely, just go to the Page Design tab, click on Change Template, select another brochure template that you like, set up the brochure in the Customize & Options settings, and click OK.
You can either print your brochure on your own home printer or you can send it for commercial printing.
The ideal size for a brochure is 8.5×11 inches if you don’t need any more space or if small is good for your brochure.

Signatures found in documents establish who you are as an individual or as an organization. Aside from the fact that…
![How To Make/Create a Newsletter in Microsoft Outlook [Templates + Examples] 2026](https://images.template.net/wp-content/uploads/2022/07/How-to-Start-a-Newsletter-with-Microsoft-Outlook-788x443.jpg)
Newsletters enable companies and organizations to communicate relevant and helpful information to their client, prospects, and subscribers. By giving you…
![How To Make/Create a Booklet in Microsoft Publisher [Templates + Examples] 2026](https://images.template.net/wp-content/uploads/2022/08/How-To-Make_Create-a-Booklet-in-Microsoft-Publisher-788x443.png)
Booklet templates are pre-designed layouts that make it easy to create a professional-looking booklet. They typically include placeholders for text…
![How To Make/Create a Booklet in Microsoft PowerPoint [Templates + Examples] 2026](https://images.template.net/wp-content/uploads/2022/07/How-To-Make-Create-a-Booklet-in-Microsoft-PowerPoint-788x443.jpg)
Booklets can be created in Microsoft PowerPoint, which offers a design feature that allows users to display them in PPT…
![How to Automatically Fill PDF Forms Using Microsoft Excel [Templates + Examples] 2026](https://images.template.net/wp-content/uploads/2022/07/How-to-Automatically-Fill-PDF-Forms-Using-Microsoft-Excel-788x444.png)
Automatically fill PDF forms using Microsoft Excel so you won’t have to save multiple PDF forms in an Excel spreadsheet…
![How to Make/Create a Floor Plan on Microsoft Excel [Templates + Examples] 2026](https://images.template.net/wp-content/uploads/2022/07/How-to-Make-a-Floor-Plan-on-Microsoft-Excel-788x443.jpg)
Floor plans either make or break projects related to engineering and architecture. That being said, every apartment room, bedroom, living…
![How to Make/Create a Grid in Microsoft Word [Templates + Examples] 2026](https://images.template.net/wp-content/uploads/2022/07/How-to-Make_Create-a-Grid-in-Microsoft-Word-788x444.jpg)
Grids consist of a network of lines that work as graphic cues while formatting your document in Microsoft Office. If…
![How to Add More Highlight Colors to Microsoft Word [Templates + Examples] 2026](https://images.template.net/wp-content/uploads/2022/07/How-to-Add-More-Highlight-Colors-to-Microsoft-Word-Templates-Examples-2023-788x443.jpg)
Add more highlight colors to Microsoft Word so you won’t have to settle with the default shading color in marking…
![How to Make/Create a Border in Microsoft Publisher [Templates + Examples] 2026](https://images.template.net/wp-content/uploads/2022/08/How-to-MakeCreate-a-Border-in-Microsoft-Publisher-788x444.png)
Borders are graphic design elements that make a document more pleasing and stylish to look at. This can be used…