![How to Add a Signature in Microsoft Forms [Templates + Examples] 2026](https://images.template.net/wp-content/uploads/2022/07/How-to-Add-a-Signature-in-Microsoft-Forms-Templates-Examples-2023-788x443.jpg)
How to Add a Signature in Microsoft Forms [Templates + Examples] 2026
Signatures found in documents establish who you are as an individual or as an organization. Aside from the fact that…
Dec 22, 2025


Sep 02, 2025
Microsoft Publisher can increase the print resolution of your images, allowing you to produce high-quality outputs. What’s more, you can create your publications in various PDF print quality formats!

High-quality output is obtained by increasing the print resolution of your images in Microsoft Publisher. There are numerous PDF print-quality formats in which you can produce publications in Microsoft Publisher.
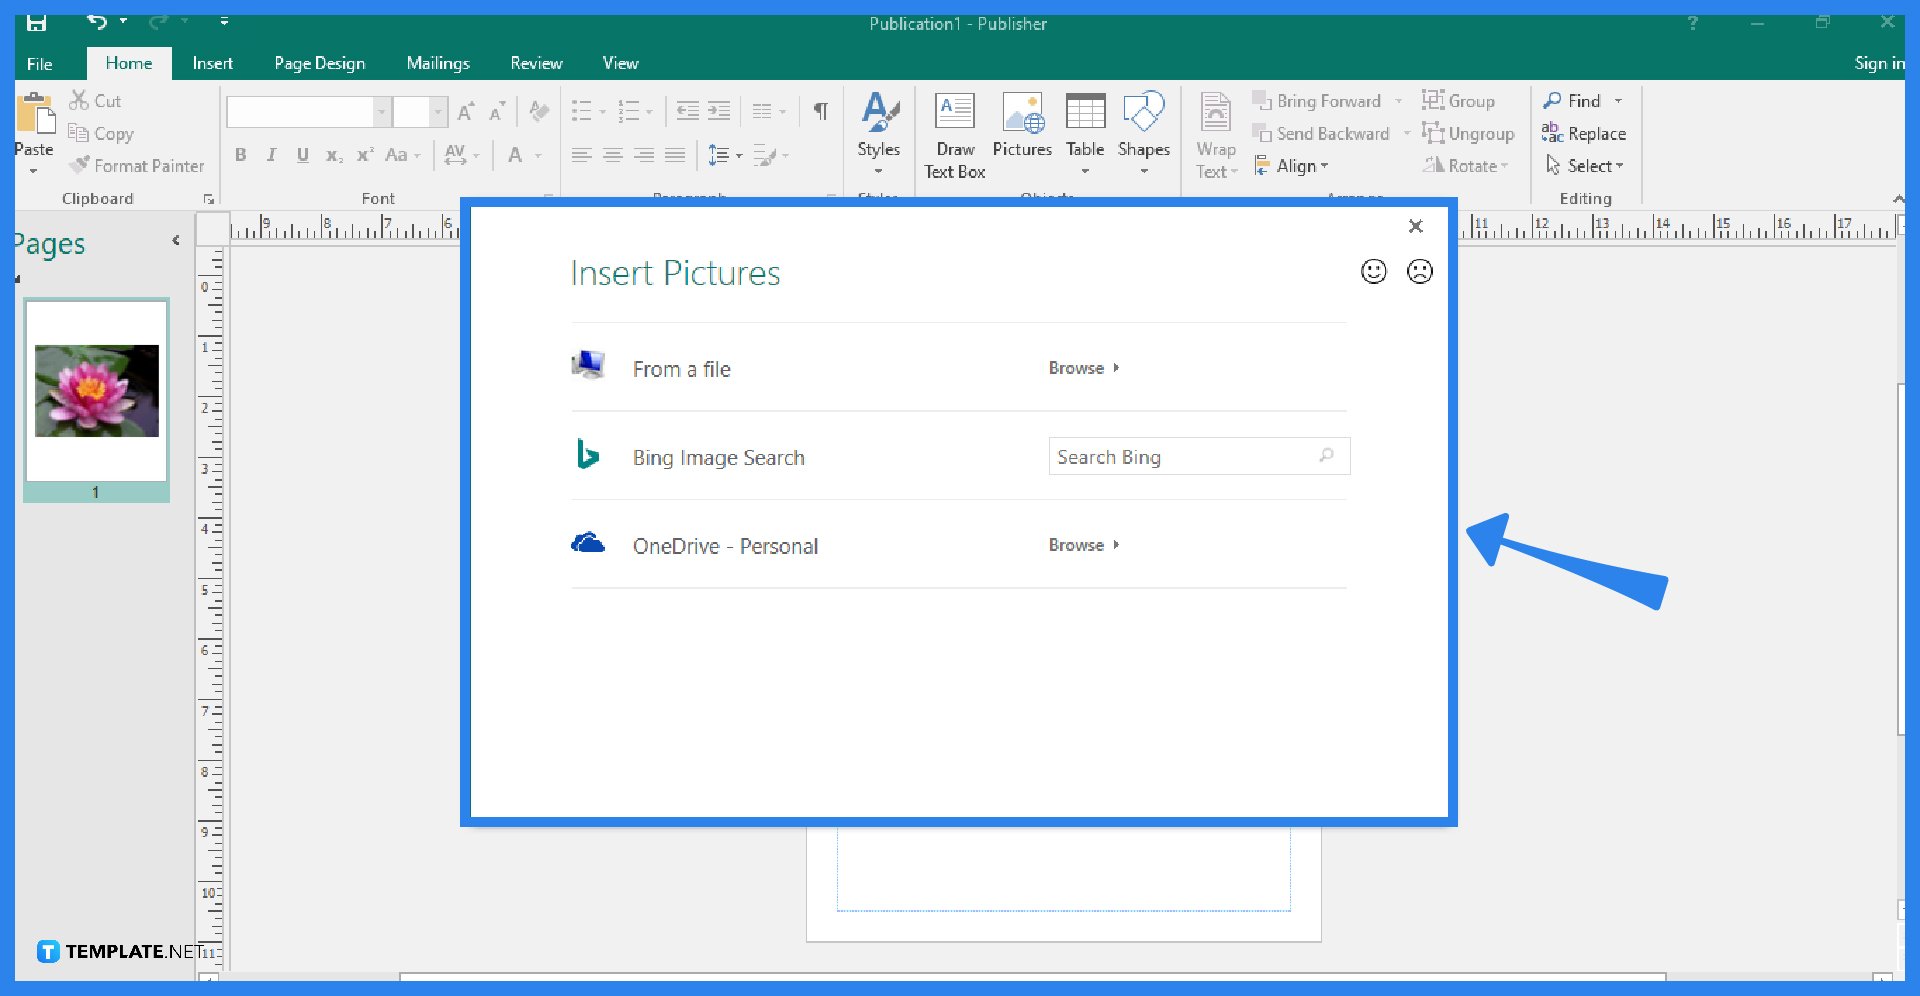
Launch your Microsoft Publisher program and create a new blank publication. Then, open the image that you want to increase the print resolution of. To do so, click the Pictures option in the Home tab, select the “From a file” option to open a picture from your computer, select the “Bing Image Search” option to search for and open an online image, or select your “OneDrive” option to open an image from the cloud.
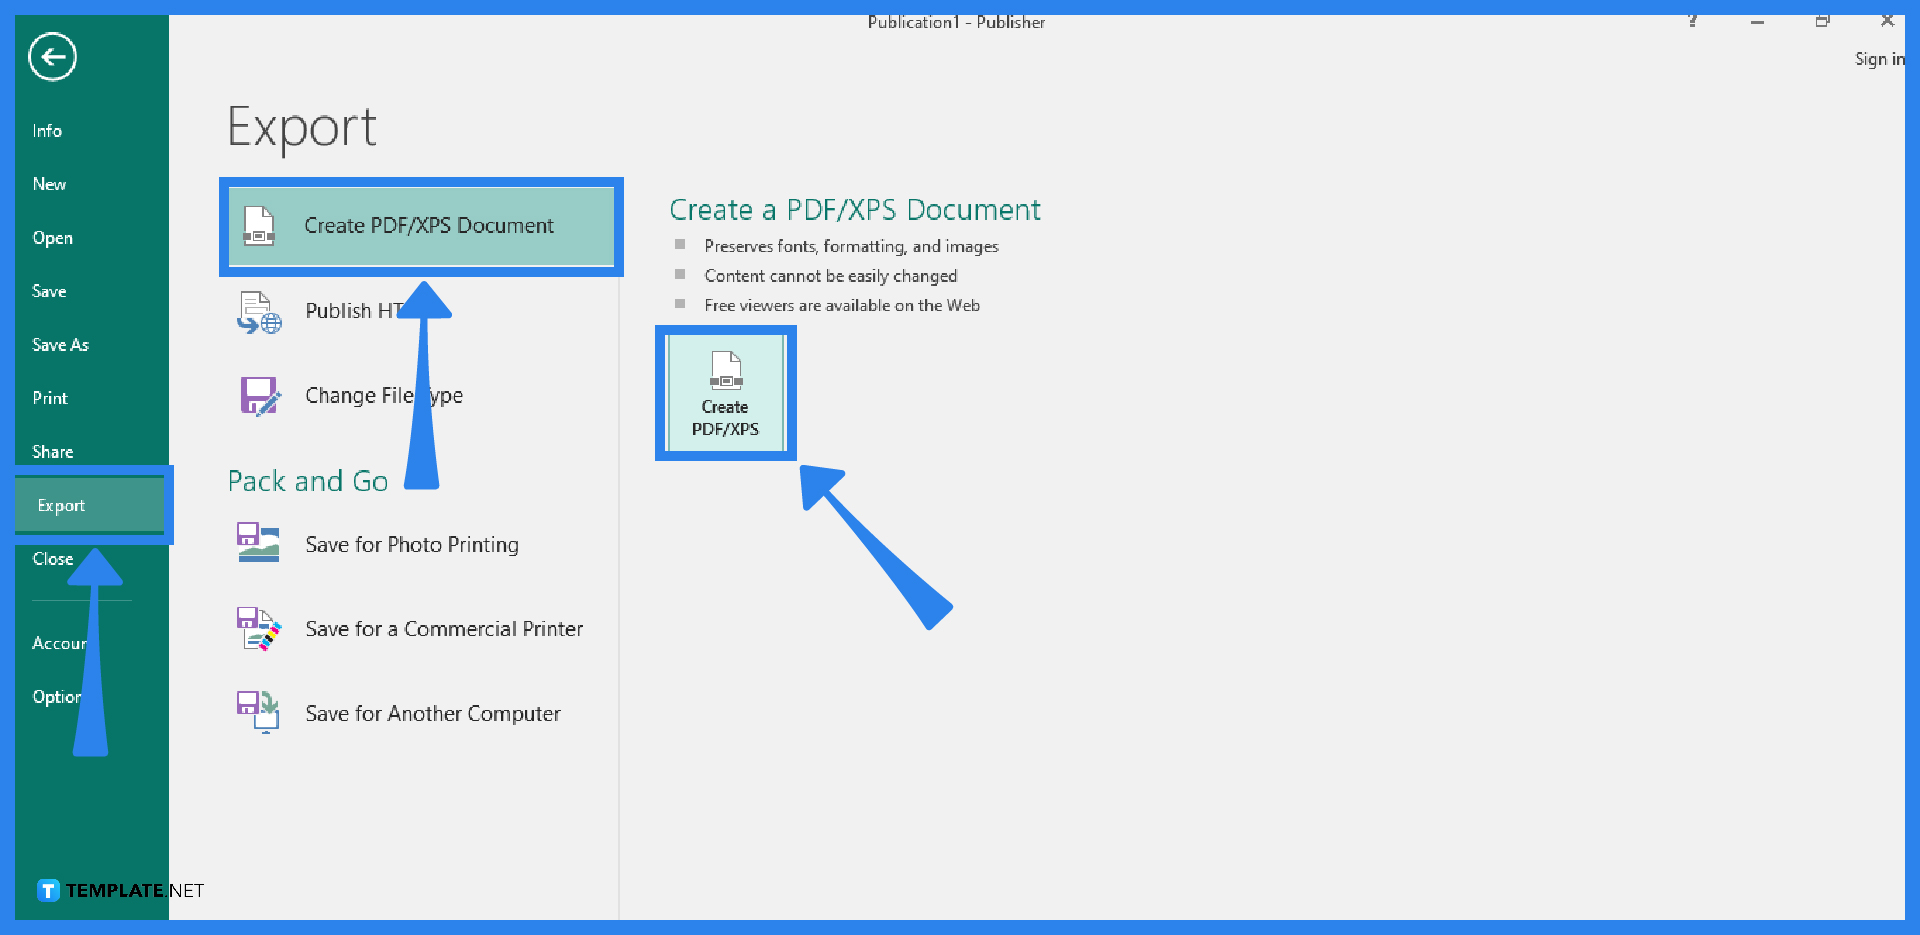
Go to the File tab of the Publisher ribbon and select the Export option. After that, choose to Create PDF/XPS Document. You will be presented with some possible reasons for creating a PDF/XPS document, like preserving formatting, ensuring users cannot change the document, and providing free online viewing availability. Then, click on the Create PDF/XPS button.
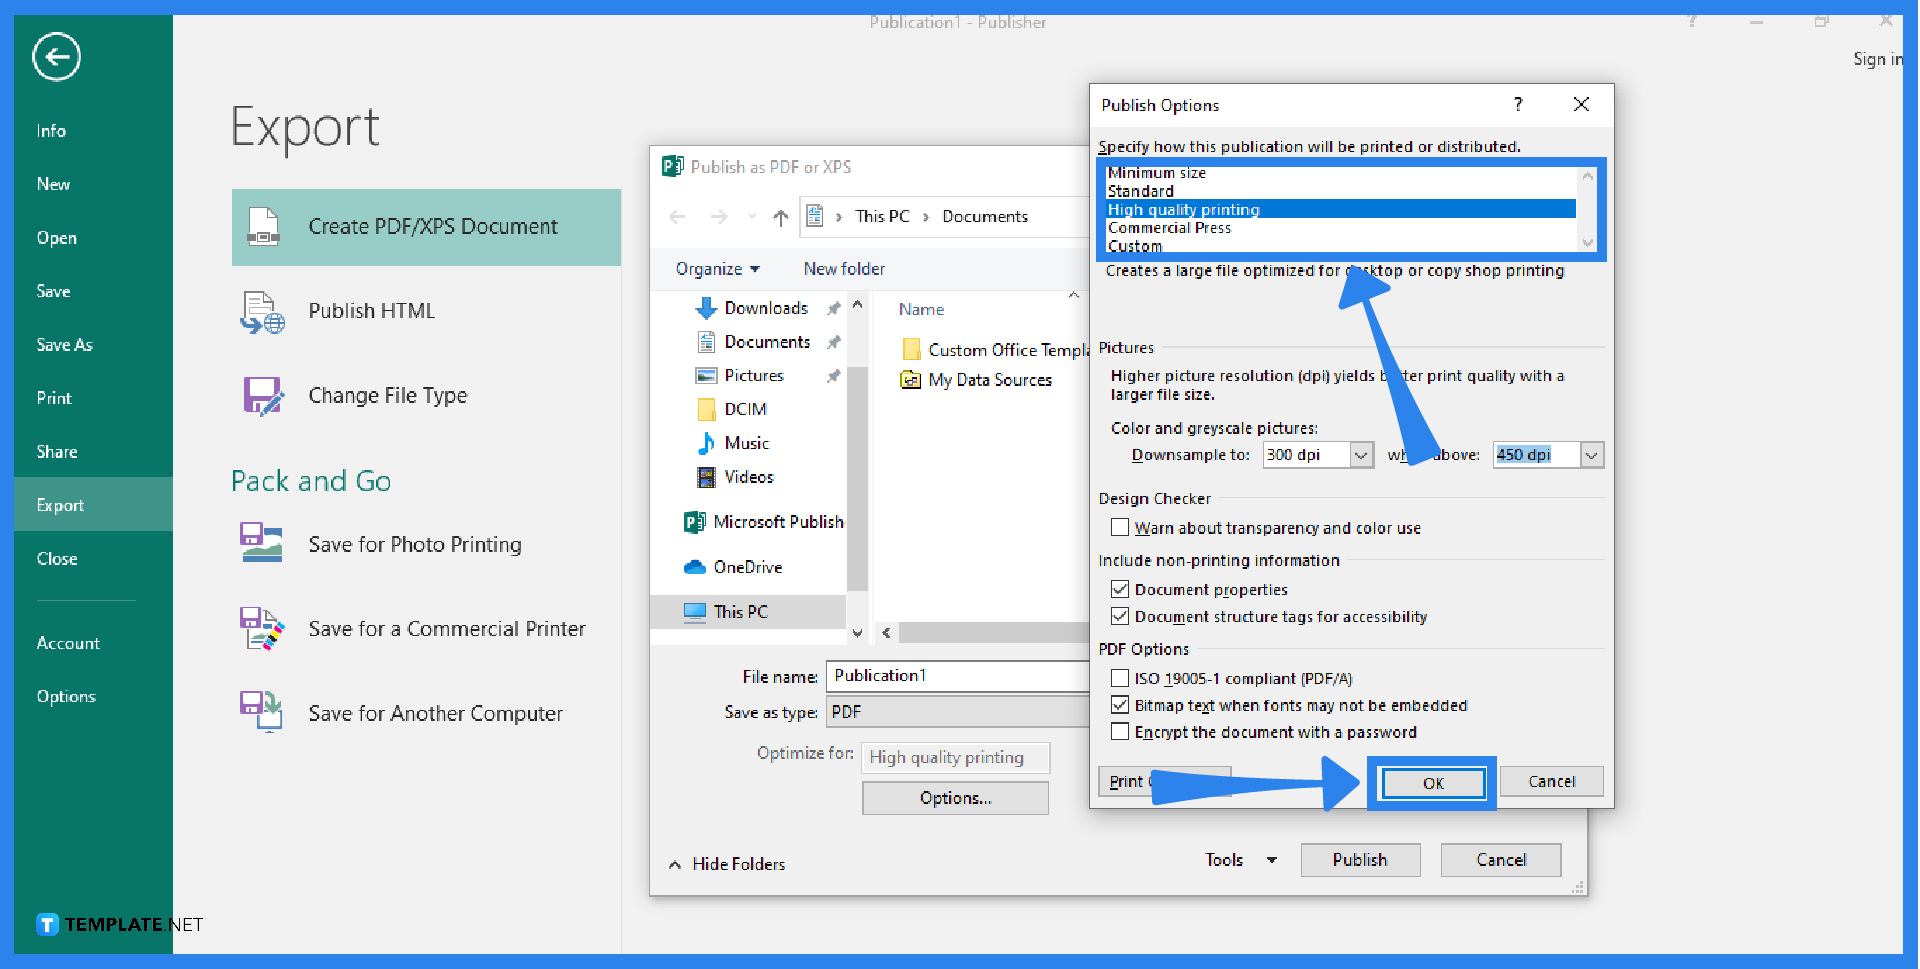
After you click the Create PDF/XPS button, enter the name of your file. As you can see, the “Save as type” is already set as a PDF. Move to the “Optimize for” option and click on the Options button. Then, specify how your publication will be printed, which includes choices like minimum size, standard, high-quality printing, commercial press, and custom. Increase the print resolution of your image by picking one of these options. Click OK and then click Save. You now have saved the increased print resolution for your image on your computer, which you can print at any time.
To print in Microsoft Publisher, select the File tab, choose Print, select the right printer, set the number of copies to be printed, make the necessary adjustments for printing, and click on the Print button to start printing.
To find the effective resolution of a picture in your publication, click on the View tab, select the Graphics Manager, click the arrow-down in the “Select a picture” option on the right side of the screen, then select Details, and the resolution is shown in dots per inch (dpi) in the Effective Resolution field.
All pictures and art files should have a resolution of 300 dpi in order to be printed (it is the industry standard since the offset press cannot accurately reproduce resolutions higher than 300).
Dots per inch, or DPI, is a measure of a printer’s resolution and it essentially refers to how many ink dots fall per square inch onto a piece of paper or other surfaces.

Signatures found in documents establish who you are as an individual or as an organization. Aside from the fact that…
![How To Make/Create a Newsletter in Microsoft Outlook [Templates + Examples] 2026](https://images.template.net/wp-content/uploads/2022/07/How-to-Start-a-Newsletter-with-Microsoft-Outlook-788x443.jpg)
Newsletters enable companies and organizations to communicate relevant and helpful information to their client, prospects, and subscribers. By giving you…
![How To Make/Create a Booklet in Microsoft Publisher [Templates + Examples] 2026](https://images.template.net/wp-content/uploads/2022/08/How-To-Make_Create-a-Booklet-in-Microsoft-Publisher-788x443.png)
Booklet templates are pre-designed layouts that make it easy to create a professional-looking booklet. They typically include placeholders for text…
![How To Make/Create a Booklet in Microsoft PowerPoint [Templates + Examples] 2026](https://images.template.net/wp-content/uploads/2022/07/How-To-Make-Create-a-Booklet-in-Microsoft-PowerPoint-788x443.jpg)
Booklets can be created in Microsoft PowerPoint, which offers a design feature that allows users to display them in PPT…
![How to Automatically Fill PDF Forms Using Microsoft Excel [Templates + Examples] 2026](https://images.template.net/wp-content/uploads/2022/07/How-to-Automatically-Fill-PDF-Forms-Using-Microsoft-Excel-788x444.png)
Automatically fill PDF forms using Microsoft Excel so you won’t have to save multiple PDF forms in an Excel spreadsheet…
![How to Make/Create a Floor Plan on Microsoft Excel [Templates + Examples] 2026](https://images.template.net/wp-content/uploads/2022/07/How-to-Make-a-Floor-Plan-on-Microsoft-Excel-788x443.jpg)
Floor plans either make or break projects related to engineering and architecture. That being said, every apartment room, bedroom, living…
![How to Make/Create a Grid in Microsoft Word [Templates + Examples] 2026](https://images.template.net/wp-content/uploads/2022/07/How-to-Make_Create-a-Grid-in-Microsoft-Word-788x444.jpg)
Grids consist of a network of lines that work as graphic cues while formatting your document in Microsoft Office. If…
![How to Add More Highlight Colors to Microsoft Word [Templates + Examples] 2026](https://images.template.net/wp-content/uploads/2022/07/How-to-Add-More-Highlight-Colors-to-Microsoft-Word-Templates-Examples-2023-788x443.jpg)
Add more highlight colors to Microsoft Word so you won’t have to settle with the default shading color in marking…
![How to Make/Create a Border in Microsoft Publisher [Templates + Examples] 2026](https://images.template.net/wp-content/uploads/2022/08/How-to-MakeCreate-a-Border-in-Microsoft-Publisher-788x444.png)
Borders are graphic design elements that make a document more pleasing and stylish to look at. This can be used…