![How to Add a Signature in Microsoft Forms [Templates + Examples] 2026](https://images.template.net/wp-content/uploads/2022/07/How-to-Add-a-Signature-in-Microsoft-Forms-Templates-Examples-2023-788x443.jpg)
How to Add a Signature in Microsoft Forms [Templates + Examples] 2026
Signatures found in documents establish who you are as an individual or as an organization. Aside from the fact that…
Dec 22, 2025


Sep 02, 2025
Microsoft Visio can create professional flowcharts and diagrams for all occasions. Editing and collaborating with friends in real-time are also a feature that Microsoft Visio enables its users to maximize.

Drawing a masterpiece in Microsoft Visio includes correcting details and adjusting shapes. These helpful steps will guide you on how to trim shapes and lines:
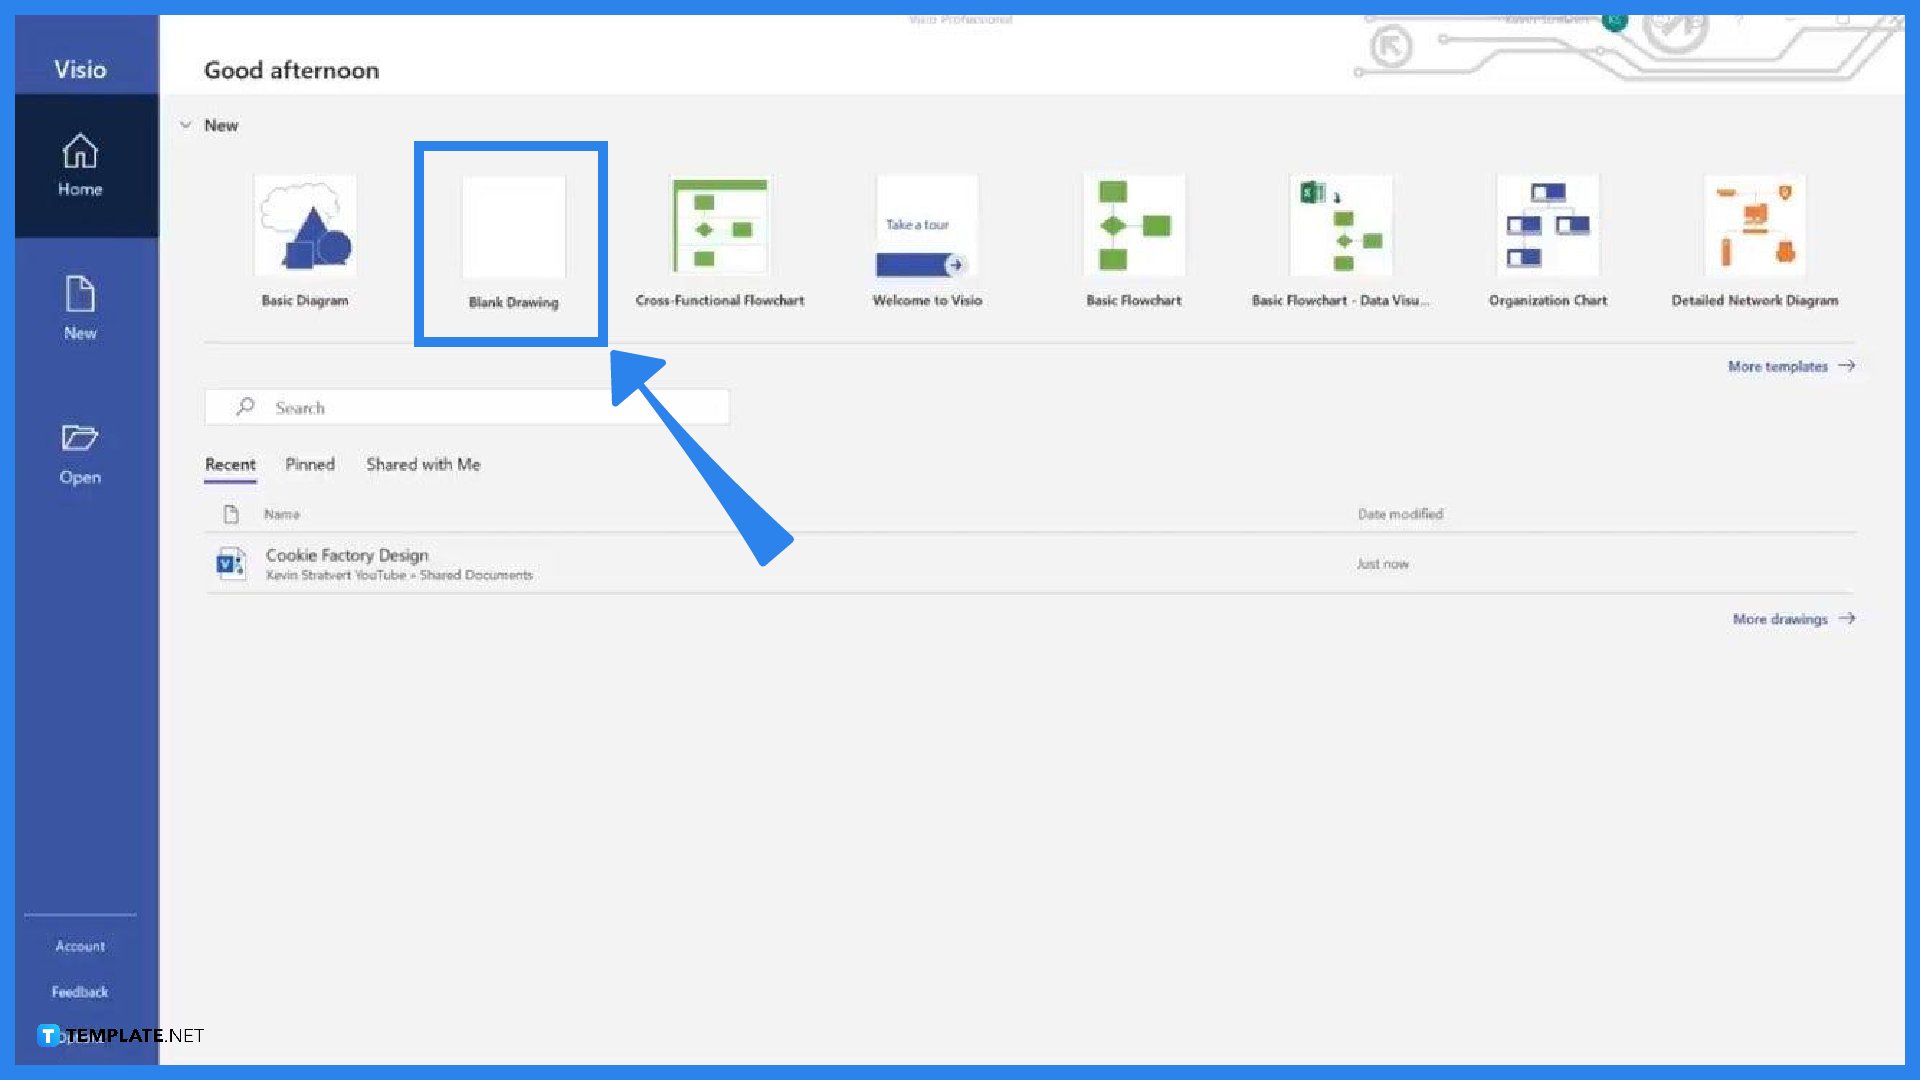
Open Microsoft Visio and create a new drawing. You can choose to make a drawing from scratch or you can choose to use a template. However, in Visio templates, editing some shapes may not be available because they are locked in that position.
The Developer tab is where the option to trim can be found. However, this tab is not placed by default on the ribbon. To add, go to File, click Options, then click Customize Ribbon. A Visio Options screen will then appear and under the Main Tabs, tick the box beside Developer.
When you can see the Developer tab on the row of ribbons, you can now start drawing. You can either customize shapes or choose from the selection of shapes and lines suggested by Visio based on the template you will choose. Simply grab all the stencils you need to complete your project, drop them on the page, and arrange them accordingly.
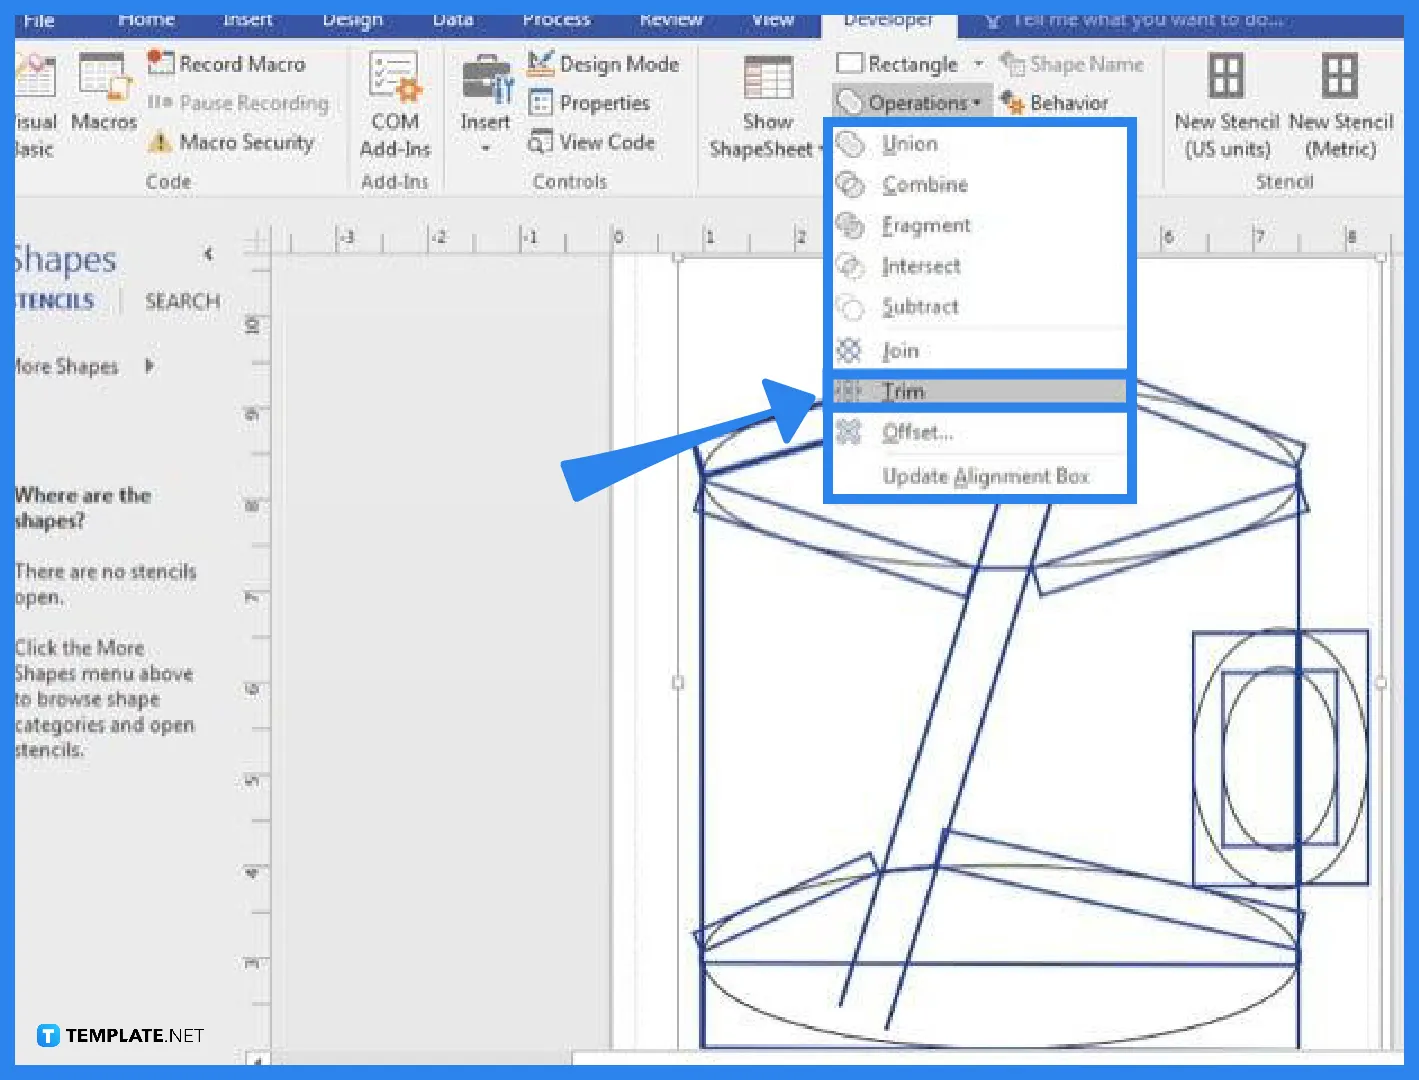
To trim, first, click Select in the Editing group and then click Select All but if you want a quicker way, just click on the drawing you’re working on and press CTRL+A. Next, click the Developer tab and look for Operations in the Shape design group then click Trim. Afterward, right-click the shape or line you want to trim and then click cut; repeat the last process until the desired drawing is achieved.
Yes, you have to manually add the Developer tab to the ribbon because it is not included in the default screen display in Microsoft Visio.
The fastest way to select shapes and lines in Microsoft Visio is by clicking the page of your drawing and using the keyboard shortcut CTRL+A.
Some shapes can’t be edited or trimmed, especially if you are using shapes from templates, because they are locked and they’re meant to stay in that position or size.
Some components of a drawing, either shapes or lines, overlap each other because some parts are needed to complete an area in the drawing and this is when you need to trim these excess parts to avoid unnecessary image distraction.
If there are specific shapes or lines that you want to trim, don’t highlight or select the drawing as a whole; instead, select the shapes or lines you want to remove, right-click them, and click cut.

Signatures found in documents establish who you are as an individual or as an organization. Aside from the fact that…
![How To Make/Create a Newsletter in Microsoft Outlook [Templates + Examples] 2026](https://images.template.net/wp-content/uploads/2022/07/How-to-Start-a-Newsletter-with-Microsoft-Outlook-788x443.jpg)
Newsletters enable companies and organizations to communicate relevant and helpful information to their client, prospects, and subscribers. By giving you…
![How To Make/Create a Booklet in Microsoft Publisher [Templates + Examples] 2026](https://images.template.net/wp-content/uploads/2022/08/How-To-Make_Create-a-Booklet-in-Microsoft-Publisher-788x443.png)
Booklet templates are pre-designed layouts that make it easy to create a professional-looking booklet. They typically include placeholders for text…
![How To Make/Create a Booklet in Microsoft PowerPoint [Templates + Examples] 2026](https://images.template.net/wp-content/uploads/2022/07/How-To-Make-Create-a-Booklet-in-Microsoft-PowerPoint-788x443.jpg)
Booklets can be created in Microsoft PowerPoint, which offers a design feature that allows users to display them in PPT…
![How to Automatically Fill PDF Forms Using Microsoft Excel [Templates + Examples] 2026](https://images.template.net/wp-content/uploads/2022/07/How-to-Automatically-Fill-PDF-Forms-Using-Microsoft-Excel-788x444.png)
Automatically fill PDF forms using Microsoft Excel so you won’t have to save multiple PDF forms in an Excel spreadsheet…
![How to Make/Create a Floor Plan on Microsoft Excel [Templates + Examples] 2026](https://images.template.net/wp-content/uploads/2022/07/How-to-Make-a-Floor-Plan-on-Microsoft-Excel-788x443.jpg)
Floor plans either make or break projects related to engineering and architecture. That being said, every apartment room, bedroom, living…
![How to Make/Create a Grid in Microsoft Word [Templates + Examples] 2026](https://images.template.net/wp-content/uploads/2022/07/How-to-Make_Create-a-Grid-in-Microsoft-Word-788x444.jpg)
Grids consist of a network of lines that work as graphic cues while formatting your document in Microsoft Office. If…
![How to Add More Highlight Colors to Microsoft Word [Templates + Examples] 2026](https://images.template.net/wp-content/uploads/2022/07/How-to-Add-More-Highlight-Colors-to-Microsoft-Word-Templates-Examples-2023-788x443.jpg)
Add more highlight colors to Microsoft Word so you won’t have to settle with the default shading color in marking…
![How to Make/Create a Border in Microsoft Publisher [Templates + Examples] 2026](https://images.template.net/wp-content/uploads/2022/08/How-to-MakeCreate-a-Border-in-Microsoft-Publisher-788x444.png)
Borders are graphic design elements that make a document more pleasing and stylish to look at. This can be used…