
How to Avoid AI Hallucinations: A Strategic Guide
As artificial intelligence continues to grow as a necessary ally in improving workflows, productivity, and collaboration, playing a larger role…
Nov 21, 2025


Jul 12, 2019
MS Excel is one of the most common and easy-to-use tools in managing small business activities. Excel can be used in financial matters at small scale, for instance, sales management. Excel comes with such features that make is possible to customize a worksheet and transform it in a working receipt template. It can minimize the effort and time vested on other resources, and thus making the system cost-effective.

The receipt created can be either send to client in hard or soft copy i.e. via print or email. With appropriate layout, format and formulas, a worksheet can be easily converted in to a receipt for your business. The most favorable option that MS Excel offers is that we always have more than one ways to work – creating a receipt is no exception. We can either use available templates from MS Excel or create a receipt on our own. In this article, we will see how to each option works.


MS Excel offers the luxury of using many pre-made templates of receipts in word. These receipts can be downloaded for free, are completely formatted and include formulas as well. Moreover, to the further ease of user, these receipts are customizable and any change can be made to the given information, format or layout.
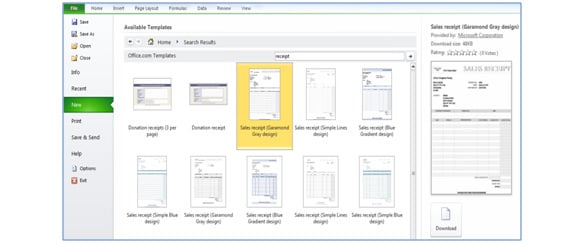
Selecting a Template:
Creating a receipt is simple. Open an MS Excel worksheet, hover on the File tab and click on ‘New’. Look up for ‘Receipt’from Office.com Templates. The Excel application will return results showing some or all the samples which exist in the database. Hover your mouse over the sample you want to see, click on it and a preview will appear.
Inserting Information
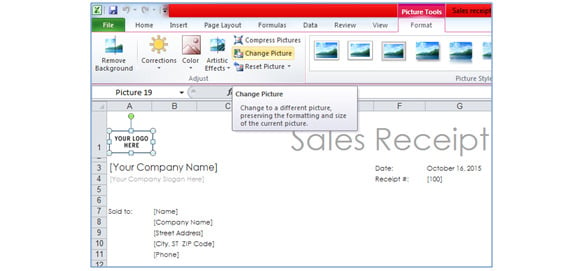
Insertyour own business information; including company logo, company name, and recipient details,in the given relevant fields. You can use various tools in MS Excel to either replace or insert your information. For instance, if you click on ‘YOUR LOGO HERE’, a new tab opens for picture options. Click Change Picture in Adjust group in Picture Tool Format tab to insert your business logo.
Testing
The template comes with all the formulas inserted. Insert imaginary figures to check if the formulas are working correctly. When done, delete all values that you inserted and save the template with the meaningful name, so that you can easily find it for future use.
Page Size and Layout
First of all, you need to decide on what would be the size of your receipt. The size can be set from size button in Page Setup group in Page Layout. Once you decided the size, go to View tab, in the Worksheet View group and click Page Layout. This will help you in checking if your desired size is in printable range or not. If not, then you should fix the size of paper.
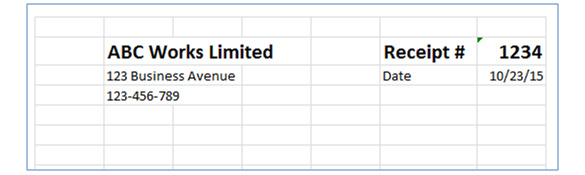
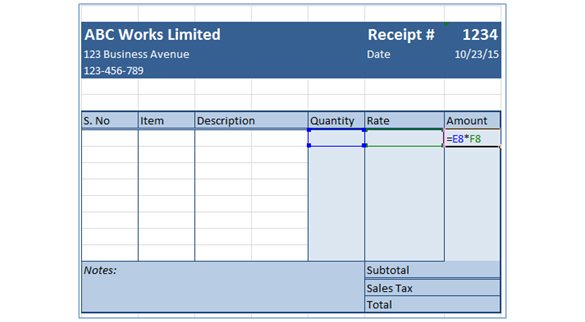
Business Information
On the right,enter your organization or businesstitle, street address and phone number. On the left, type ‘Receipt’ and give it a receipt number, for example ‘1234’. You can also modify the text font and size, by highlighting the cells and using options from the Home menu. Enter =NOW() in the date cell to include automatically updating live date and time.
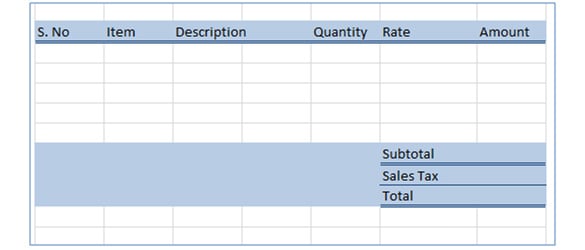
Setting Columns Heads
Enter column headingfor the receipt, including S. No., Item, Description, Quantity, Rate, and Amount. You can further format the column headers through Font group in Home tab. For instance, highlight and underline the heading by selecting related formatting options available.

Fields for Total
Move down to the bottom of the page to enter totals fields. In the column underneath Rate, type Subtotal, Tax and Total. Again format the cells similar to the headers. Use a Single bottom Border on the Tax cells and Double Bottom Border beneath the Subtotal and Total cells to further highlight the important figures.
Final Touches
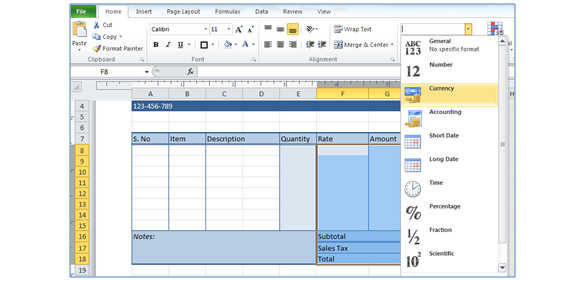
Now to identify all the sections of the receipt, you need to distinguish each section with a Box Border. This is available from the Border icon in the Home tab. For some additional information, keep the space beside Subtotal and total, and name is Notes. You can highlight all of the cells in the Rate and Amount columns to give them a distinction. Select the columns Rate and Amount, Subtotal, Sales Tax, and Total and change the category to Currency.
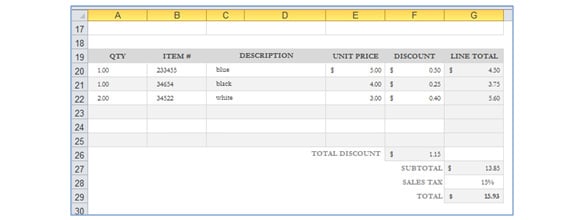
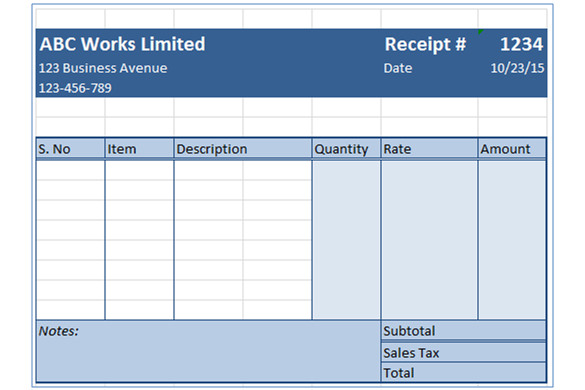
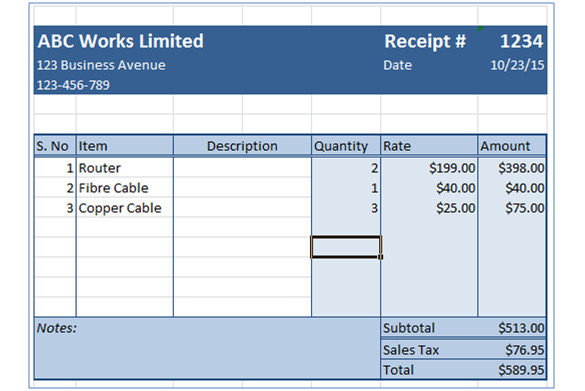
Your receipt shall now look like this:
Entering the Formulas
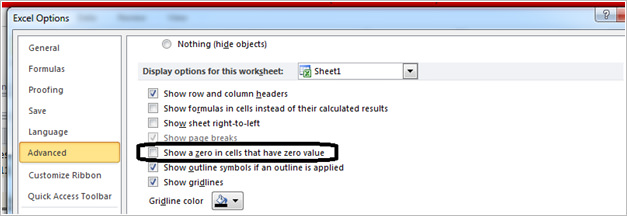
Before entering any formula, we need to uncheck an option in Excel. Excel is programmed to fill in the empty cells (where formula is used) with zero. Go to File tab, click on Options, and then Advanced. Scroll down to Display Options for this Worksheet and then uncheck box “Show a Zero in Cells That Have Zero Value”. Click OK. This option prevents the receipt to show $0.00 in blank cells.
Calculating Amount
Select the first empty Amount cell. This cell needs to multiply the units by the Quantity and Rate entered. Type “=” and click the Quantity cell, type “*” and then click the Rate cell. Press Enter. Drag the Fill Handle to copy formatting and formula in all the cells under it.
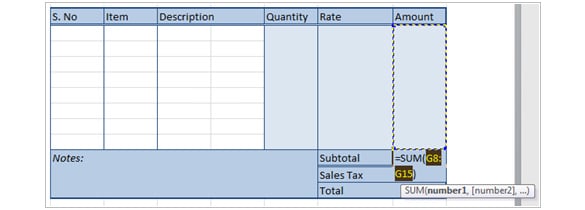
Adding Subtotal
To do a simple addition function, select the cell next to Subtotal. Then in the Formulas tab, click the AutoSum icon.

Drag the cursor across all of the Amount cells and press Enter. Any amount added in these cells isautomatically added to the Subtotal.
Applying Tax
Select the cell next to Sales Tax, which will multiply the Subtotal by your applicable tax rate. Type “=” and click the Subtotal cell. This will replicate the values displayed in Subtotal. Enter an “*” and then the tax percentage as a decimal. For instance, if the Sales Tax applied is 15% on the Subtotal cell, the formula will be “=G20*.15”.The given formula will calculate the tax applied on Subtotal. [Tax Receipt Template]

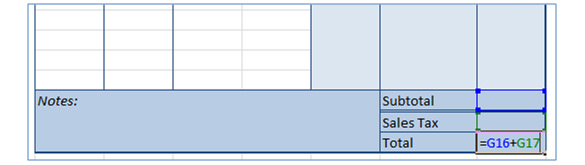
Calculating Total Amount
If you wish to calculate the total of two or more cells, the addition formula must be applied. In this example, in the cell next to ‘Total’, input the formula “==G16+G17”. Cells G16 and G17 display the SubTotal and Sales Tax respectively. When the final total is generated, Subtotal and Sales Tax will get summed up as well.
Testing
Enter some dummy figures to test the formulae. Also calculate them manually to check if the Amount, Subtotal, Sales Tax and the Total are correct. Once they are correct, save the receipt file.
Feel free to share, if this articles helps you!

As artificial intelligence continues to grow as a necessary ally in improving workflows, productivity, and collaboration, playing a larger role…

Creating a meal plan can help you stay on track with healthy eating and reach your dietary goals. With a…

Of course it is a no less achievement to land a new job in a new organization. However, if you’re…

Creating a resume on a Mac needs a word processing document. In this case, first of all, you have to…

If you are looking forward to becoming your family’s genealogist, creating a family tree should be one of your significant…

Certificates are essential in every large organization, when you want to congratulate your workers for a job well done, sending…

A family tree (also known as a pedigree chart) is an illustrative diagram with mini photos, word art, and other…
MS Excel is one of the most common and easy-to-use tools in managing small business activities. Excel can be used…

Students in school are often given assignments wherein they are encouraged to write or draw diagrams about their families. The…