Get Access to World’s largest Template Library & Tools

How to Make Neon Light Flicker in Apple Slow Motion

Apple Motion lets you create and edit animations and video projects with user-friendly features and tools. Improving your creativity in film productions is indeed easier with the help of Apple Motion.
How to Make Neon Light Flicker in Apple Slow Motion

Apple Motion will allow you to apply animations to your projects. Speaking of animations, the program has a neon light flicker feature that you can add to your videos to further enhance the quality.

  • Step 1: Enable 3D Text

    To make a symbol or a text appear like it is tubular as common neon lights, you have to enable the 3D Text by going to “Text Inspector” and clicking “3D.” Under “Material,” click the preset, choose “Miscellaneous,” and select “Soap Bubble.” Then set the initial look of the text by changing it to the color you prefer, lowering the “Coverage,” and adjusting the “Fresnel” level.

  • Step 2: Add Detail

    In this step, you have to add more details to the text or symbol to make it more plausible as a neon light. Go to the “Filter” option and choose “Glint;” you can adjust the softness and the glint according to your preference. Then, add a wall (for the light to reflect on) by inserting a shape, either a rectangle or square and choose the texture of the wall from the “Material” option.

  • Step 3: Add a Light Layer

    how to make neon light flicker in apple slow motion step 0
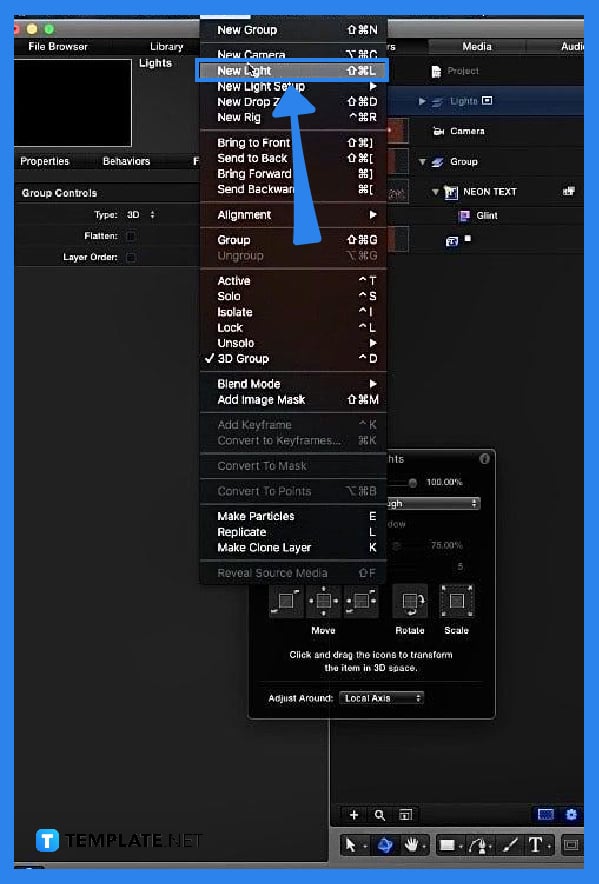
    After adding other details to the text or symbol, you need to add a light layer. Go to the “Object Menu” in the topmost ribbon and select “New Light.” Adding this layer will enable you to adjust where the light will reflect on the text, how strong the light will be, and what color it will emit.

  • Step 4: Add Wriggle Behavior

    Select the text or symbol, go to “Behaviors” next to “Properties,” and enable the “Wriggle” behavior. You can change where the behavior will be applied by choosing the “Properties Blending Opacity” from the drop-down option. This added layer to the text will make it turn on and off.

  • Step 5: Add Link Layer to the Light Layer

    Select the “Light” layer you added to your project then go to “Behaviors” and choose “Link Behavior.” Doing this will link the opacity of the light and the text which will make both of them turn on and off. After applying all the details and functions to the text or symbol, you can play the project to see how it looks altogether and then export the file after.

FAQs

How to add a background to the symbol or text?

Apple Motion doesn’t have an automatic tool that allows its users to add a background; instead, you can add a square shape, move it behind the text, and format its texture by choosing your preferred design in the “Material” option.

How to make the text or symbol look round in Motion?

Under the “3D Text” menu, look for “Front Edge” and select “Round;” you can also adjust the weight of the 3D text according to the roundness you prefer.

What is the best font style for making neon light text in Motion?

This depends on the preference of the artist and the design that they want to achieve using this animation technique.

Which is better for creating animation: Motion or After Effects?

Both applications have great tools and features fit for creating quality animations and whether Motion is better than After Effects depends on the user and the convenience they get from the app.

How can objects look like flickering neon lights using Motion?

Objects can look like flickering neon lights, too, as long as the wriggle behavior is incorporated into the object layer.

More in Apple

How to Change Clip Speed in Apple Final Cut ProHow to Create Camera Archives in Apple Final Cut Pro
How to Change Settings in Apple Final Cut ProHow to Create Square or Vertical Versions of a Project in Apple Final Cut Pro
How to Change the Workspace Layout in Apple Final Cut ProHow to Configure Audio in Apple Final Cut Pro
How to Change Aspect Ratio in Apple Final Cut ProHow to Make Neon Light Flicker in Apple Slow Motion
How to Use Compressor Apple Final Cut ProHow to Cut Clips in Apple Final Cut Pro
How to Export Still Images with Apple Final Cut ProHow to Publish Controls to Apple Final Cut Pro
How to Add Shape Mask in Apple Final Cut ProHow to Add Presets in Apple Final Cut Pro
How to Export a High-Resolution Movie Out of Final Cut ProHow to Create a Flowchart in Apple Final Cut Pro
How to Create a Time-Lapse in Apple MotionHow to Add Clip and Project in Apple Final Cut Pro
How To Make/Create a Drop Down List in Apple Numbers [Templates + Examples] 2023How to Round Up Numbers in Apple Numbers
How to Split Text in Apple NumbersHow to Do Text Tracking in Apple Final Cut Pro
How to Recover Deleted/Unsaved Files in Apple NumbersHow to Get Apple Final Cut Pro for Free
How to Replace Object on Apple MotionHow to Add a Border in Apple Final Cut Pro
How to Export Video in Apple Final Cut ProHow to Automatically Play, Loop, or Restart a Slideshow in Apple Keynote
How to Do Object Tracking in Apple Final Cut ProHow to Crop Clips in Apple Final Cut Pro
How to Add a Footnote on Apple Final Cut ProHow to Export Apple Final Cut Pro to MP4
How to Convert CSV File in Apple NumbersHow to Merge Clips in Apple Final Cut Pro
How to Use Color Board in Apple Final Cut ProHow to Watch Apple Keynote
How to Add Apple Music to Final Cut ProHow to Sort In / Sort Out in Apple Numbers
How to Import Audio Files/Clips into Apple Final Cut ProHow to Create Animated Instagram Stories with Apple Keynote
How to Reveal Text in Apple MotionHow to Add Text and Titles in Apple Final Cut Pro
How to Create a PDF Handout or Outline of Your Apple Keynote SlideshowHow to Print Apple Keynote Slides / Notes
How to Match Move in Apple MotionHow to Make a Slideshow in Apple Motion
How to Use Emitters in Apple MotionHow to Track an Object in Apple Motion
How to Make Effects in Apple MotionHow to Reverse Keyframes in Apple Motion
How to Do a Handwriting Effect on Apple MotionHow to Remove or Turn Off Effect in Apple Final Cut Pro
How to Make Product Animation in Apple MotionHow to Make a Budget with Apple Numbers
How to Make a Logo Intro on Apple MotionHow Do I Edit Audio in Apple Motion?
How to Use Filters in Apple MotionHow to Create a Scrolling Text Effect in Apple Keynote
How to Upscale Video in Apple MotionHow to Open Apple Motion Video in After Effects
How to Change Speed in Apple MotionHow to Convert Apple Motion to Final Cut Pro
How to Fix Apple Numbers Not OpeningHow to Convert Apple Numbers to Google Sheets
How to Autofill Numbers in Apple NumbersHow to Add Sound in Apple Motion
How Do You Set Tab Stops in Apple PagesHow to Enter Check Mark in Apple Pages
How to Freeze Rows and Columns in Apple NumbersHow to Open Apple Keynote Files on Windows
How to Open and Convert PDF in Apple KeynoteHow to Undo Changes in Apple Keynote
How to Delete Audio in Apple MotionHow to Create a Transition in Apple Motion
How to Create Digital Menu Boards with Apple KeynoteHow to Convert PowerPoint to Apple Keynote
How to Change Colors in Apple MotionHow Do You Make Longer Timeline in Apple Motion
How Do I Add Line Numbers in Apple PagesHow to Create Your First Apple Keynote
How to Restore Previous Version of Docs for Keynote AppleHow to Use Apple Keynote Live Video to Stream
How To Transpose in Apple Numbers [Templates + Examples] 2023How to Change Default Font in Apple Keynote
How to Recover Delete/Unsaved Apple Keynote FileHow to Make Hyperlinks in Apple Keynote
How to Insert a Video in Apple KeynoteHow to Change the Order and Timings of Builds in Apple Keynote
How Can One Attend an Apple KeynoteHow to Add or Remove Rows and Columns in Apple Keynote
How to Get Apple Keynote on WindowsHow to Delete a Table in Apple Keynote
How to Completely Remove Apple Keynote on MacHow to Add a Highlight Effect to Text in Apple Keynote
How to Undo/Redo in Apple NumbersHow to Make Timeline in Apple Keynote
How to Put Page Numbers in Apple NumbersHow to Calculate the Percentage Using Apple Numbers
How to Use Sum Function in Apple NumbersHow to Link Cells in Apple Numbers
bottom banner